Two cross-stitch kitty book marks for an avid reader.
Tuesday, January 25, 2011
Thursday, November 4, 2010
Grandma's Wooden Chest
I get a lot of my belongings as hand-me-downs which I either treasure as heirlooms or fix up to make my own. My grandmother's wooden chest is an example of one that I fixed up to make my own. The original color was a baby blue which matched my grandmother's bedroom. My grandfather had painted it with oil paint to match. It was a real shame because the wood underneath was absolutely beautiful (you could see it at the edges. In fact, you can see the original blue of the chest in the background of my original Chii costume post here:
http://ginger710.blogspot.com/2008/11/halloween-2005.html
Anyhoo, most of my furniture is a dark cherry color. Since it was painted with oil paint, stripping it would have been a VERY daunting task since it is carved wood. I decided to repaint it with oil paint that matched the wood stain. Let me tell you how hard it is to find ANYONE who sells oil paint anymore! God Bless Ace Hardware!!
Once the chest was painted, I added a bit of copper and gold painting detail to the carved wood on top of the chest to make it stand out a little bit - just because the carving is absolutely beautiful. I topped the chest with a custom cut piece of glass I bought from a glass and mirror wholesaler in Warren and it became a beautiful coffee table to treasure!
Halloween Pumpkin
Every year it's the same jack-o-lantern - triangle eyes, triangle nose, cruved mouth with some teeth cut in. *sigh* This year after seeing so much inspiration online I decided to attempt a different type of pumpkin - a haunted castle scene.
I tried this once before (tinkerbell, which failed miserably and Stitch which looked kinda funny all lit up), but this one seemed simple eno
I broke out my pumpkin carving tools, which I lovingly keep in a black tin just for the holiday, and carved my pumpkin.
Once I was done, I painted the castle and bat to make it stand out even when it wasn't lit. Actually I was quite pleased with it - lit or not!
Paisley Painting
In my new house, thee bathroom is designed with tan and teal tiles with a teal sink and bathtub. It's really difficult to find accessories and ensembles to match! Instead of matching, I decided to find a neutral accent color. Since it was already tan in the bathroom, my original thought of bamboo would have blended right in and looked very plain. I found a fantastic set from Bed Bath and Beyond that was black and had little rhinestone crystals in it. Just the neutral with a pop of color I was looking for!

The walls were also very bare. So - knowing me and how I do art - I made a painting to fit the space! I used the black, teal and tan colors that were already incorporated into the bathroom. I also added little rhinestone crystals to the painting to incorporate that element, too and tie everything together!

The walls were also very bare. So - knowing me and how I do art - I made a painting to fit the space! I used the black, teal and tan colors that were already incorporated into the bathroom. I also added little rhinestone crystals to the painting to incorporate that element, too and tie everything together!
Since I didn't really have a theme like pinup girls, shoes or the seashore like past bathrooms, I wanted to make sure the painting didn't really have a subject. Instead, I utilized a really ornate paisley design that brought out all the colors and sparkle that the bathroom already had. I am so happy with the way it turned out! I think this may even rival my mother's tigerlily as my favorite painting now!!
Sunday, May 9, 2010
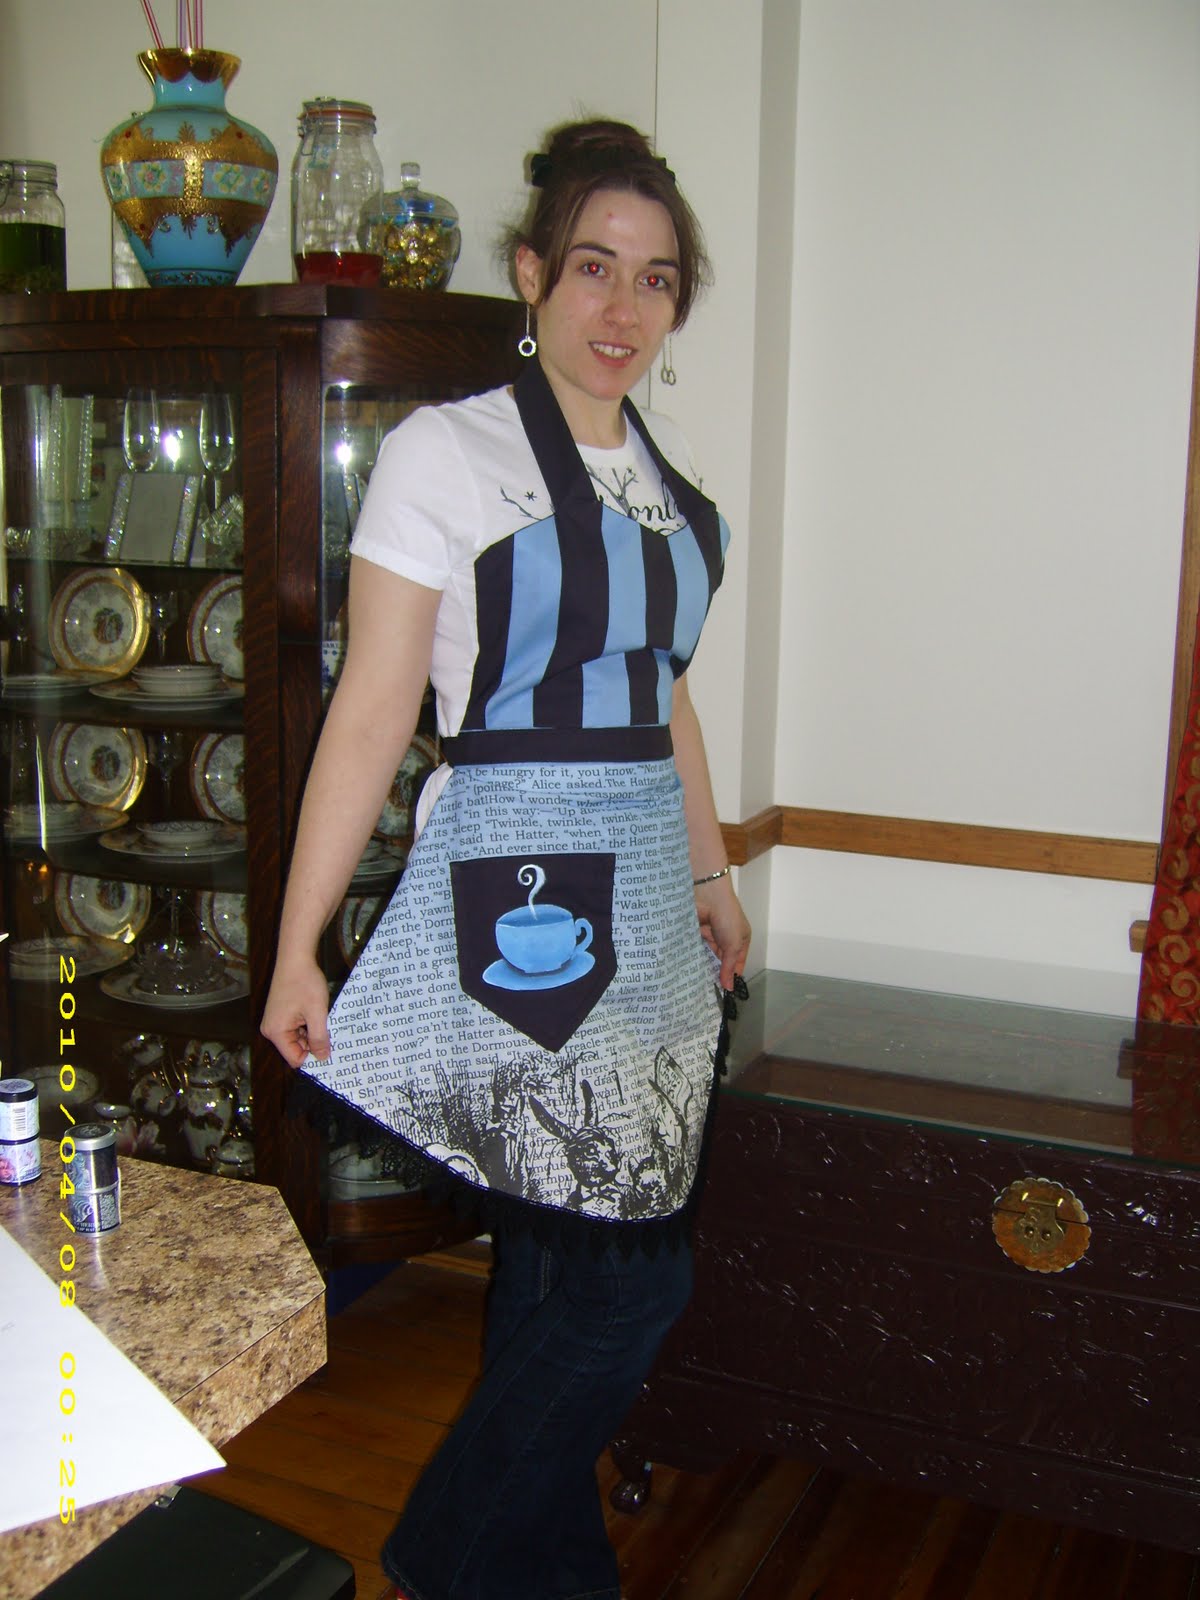
Alice Apron
I was introduced to a fantastic website called spoonflower. While searching the fabric on the website I found some great material that has a border of of the mad tea party from Lewis Carroll's Alice in Wonderland in black and white with the words of the chapter of the tea party in the background. As the material continues up from the border, the material becomes more of a deepersky blue. When I saw this material I immediately thought of using it for an apron!
To compliment the material I thought I would make the top part blue and black striped. I added black lace to the bottom of the apron for a little whimy and a black pocket to the apron. I painted a blue teacup onto the apron to complete the theme. I am soooooo happy with the way it turned out!!
Lots of Table Runners!!
Last year I bought a lot of cute print fabric in hopes of using them for table runners that could be changed by the season. This year - considering I have had some time on my hands, I was able to make them all - all 5 of them!
The next one I made was for halloween. I found this incredible pumpkin material that had bats, witch hats, wands and stars. Against a blue background. To pick up on the black accents I picked a black border with black tassels. It came out so cute and I can't wait for halloween to come to try it out!
The next table runner was a fanstic mod green print that reminded me of leaves. The green leaves with a brown border and brown tassels was a great choice for a summer table runner.
The next one is the same as the mod green leaf material except it is bright warm fall colors of red and orange. with the same brown border and tassels I am excited to use this for the fall - outside of the halloween time frame.
The final table runner was meant to be for everyday use. I wanted it to match the red, black and white asian plate set that I made the trivets for before Christmas.
I found a great red black and white floral material that was able to fit with the plate set quite nicely. I gave this a black border with black tassels.
The first one I made was an asian print that had blues, greens and browns. the pattern I used had a border on it, so I decided to go with the greem in the pattern - I am very happy with the way it turned out - I think this one is my favorite.
All-in-all I am very happy with the way then came out and I should be all set with table runners for some time. I'll be looking for Christmas material next!
Chess Painting Set
Subscribe to:
Posts (Atom)